Monday, May 7, 2012

Week 6 - Kyle Hayes


This week we built and tested our individual designs to see what was the best and what were good components of the design. Upon reaching l 
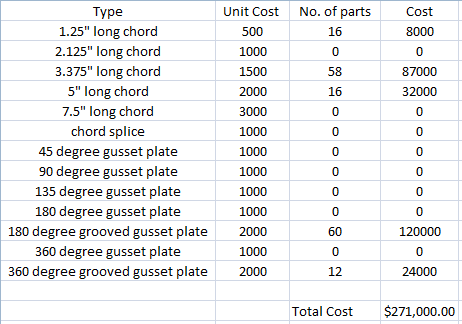
design and testing it, we found that the ends were the weakest and failed after a few pounds and the grooved gussets were pulled apart easily so to make it stronger at the gusset and cheaper we will use non grooved gussets and to help with support we made the pieces between the gussets shorter. This will make it more stable, compact, and cut cost, but this will require more pieces which will increase the cost a bit but not over the original design.

I feel the same about what I stated last week about WPBD and K’NEX, both are fairly different and the K’NEX is much more restrictive. The difference with Steel and the K’NEX is that the steel would allow for customization of length and gussets and thus give more options it rather than just ten fixed pieces. At the same time give many more options and starts to be a bit like WPBD in that you have price dependent on weight rather than piece and you have to pick solid or hollow and the length and it becomes more complex to figure out the bridges strength.

Next week we will be testing our K’NEX design for the two foot span, followed by going back to improve our design and prepare for the final test with the three foot span.
    - Kyle Hayes

Wednesday, May 2, 2012

Week 5 - Yilei Jiang

      The lecture I experienced from this week was abundant and useful. I knew four major components of a truss bridge. And I familiarized with my team member how the K'nex from shapes. I basically knew the steps of designing a truss bridge in reality from the K'nex, like making an idea; choosing materials; build as a model;  budgeting; testing; editing and etc. There must have a lot of different in detail when I am doing a real project. And for K'nex, I felt the materials could predetermine how the bridges look like. I didn't feel that when I made a bridge via WPBD. Besides, K'nex is a real and touchable toy and lots of problems will come out. For instance, in WPBD, the truck has such a strong climbing ability. It can still pass the bridge when it is down to the bottom of canyon.  However, it will never happen in reality. So when I test the K'nex bridge, it will collapse if it can hold the weight any more.
       I also listened a speech in class. It was a speech by Mr. Jay Bhatt, our engineering research librarian, about the most efficient way to look for engineering-related books from Drexel Libraries. He demonstrated the way that searches different resources in the class. I felt that that made my study much easier than before.
       For next week, we are processing the K'nex. We will pick the best idea from our  team and build it with K'nex.


A2 - Jiang

     The idea of my bridge's shape is from the results of West Point Bridge Design I tried last week. During several times of experimentations, I found that it was much easier to make a bridge for doing bottom and top truss at a same bridge. I tried to do only bottom truss, like Deck Truss. However, the bridge always collapsed when the truck was passing. And the bridge even cost me more money when I finally made it without top truss because I have to add more web members to make the bridge be stable.  My original design, which has both of bottom and top truss, its strength and tension were evenly distributed by the short chords I added on the top. 


side view
top view
Bill of Materials - K'Nex pieces


Height: 5.875"
Length: 27.028"

     I used colors to differentiate the various chords I added. The yellow chord is 3.375" long; the red chord is 5" long; the black chord is 1.25" long.

    About the gusset plates, I used three types of those plates. Two of 360' gusset groove plates could connect the top and bottom truss in the middle. And when I thrusted a 90' gusset plate into a 180' gusset groove plate, the mixture gusset could connect the rest of members. 


About changes
      At first, I tried to make a bridge with arch. But end up with failing. May be because the arch bridge can not be done with K'Nex pieces.  So I started to make a K truss bridge and I thought that it shortened the lengths of the compression members compared to the other trusses. The thing I changes of K truss was I added two short chord under the middle K truss. ( like the picture shows below) 

 The reason why I did that is because this two black chords could support the top better. 


What I learned from K'Nex is the material I chose can limit my idea of bridge design. But I also also learned how to those prescriptive chords and gusset plates to build different shapes of truss bridges. 

- Yilei Jiang


Tuesday, May 1, 2012

week5-xue bai


     Last week in class we listened a speech about how to find use information about our bridge design. Mr. Jay Bhatt come and shows some useful book that we could look at. I also got to know that our library have a lot of useful thing I can look at to improve my knowledge of bridge. Then we learn about the basic rule about the k’nex bridge design. like how long should it be and how to find out how many weight it can keep with out break it. The cost of the bridge is also a big part we get look at the sheet of the cost of each part. The last part of class we get a change to play with the K’nex.
     Next class we would really start built our own bridge. We would try to finish the bridge in class. Try to find the best bridge with can hold more weight and cost less.
     The k’nex is different from the WPBD by many ways. The k’nex did allow you to changer any of the size of the bridge. You have only one size over all. Also the really K’nex bridge did allow you to text it over and over to get a best type. The WPBD would tell you which part is weak and need to improve, but K’nex will not. K’nex is more really, it is a really thing than just a program. It also made it harder because it is really not ideally any more. You need to think more carefully of every peace. There would be a lot of unexpected problem appear, but I am ready to handle it.       

A2 - Hayes


The reasoning of my shape is because I like the results I have gotten in WPBD using a top and bottom truss. Although I do wish the top was more arch like but I found it difficult to make but given more time and experimentation I believe it will become more arch like in the future. It was shaped to be fairly condensed using short pieces as they were more stable in testing also it is not too expensive as the longer pieces are and it does not require too many gussets as if done using shorter length peices.
Side View

 Top View
 I felt it was unneeded to put the lenghts and dimensions as it is color coded and each color has a fixed length. White: 1.25", Yellow: 3.375", Red: 5"

The gussets are blue dots and are all made of two 180 degree grooved gusset plates put together so the cross bars can be added to attatch the two sides. the only exception is there are 5 gussets per side that are 180 degree grooved gusset plate and 360 degree grooved gusset plate together, these are used in the middle where the gusset has bar located to the top, bottom, and both side.


Height: 6.77"
Lenght: 25.25"

Cost Table


There were not many changes as I wanted to keep it as simple as possible but some of my changes are as followed. The base was made of five red bars, I changed to six yellow as I feel the shorter ones will be more stable and offer more connections on the upper level. Second the highest level was just like the middle but I changed it to be like the bottom in hope that it would be more stable and also to cut cost. Also the bars that connect the two sides was red but I changed it to yellow bars as it would condense it and also cut cost a bit. These were the major changes.

I learned that some time material is predetermined in length and thus options are limited and some designs require tweaking or may not be possible.
   - Kyle Hayes

A2-Xue

By the experience of using WPBD I know that the single line up is the most effect way of building the bridge. This time with the K’nex I am also try to make a simple line bridge. I use 3.375’’ as my basic chord. I find out that the 3.375’’ is the most effect length. Short that that would cost a lot of the join and long that is too long that cannot hold enough weight. I use two different triangles in the middle. In the really middle are four small triangles and the one beside it is three. By the WPBD experience I got know that the middle is the place than get most of the force, so I put more chord to support the weight. On the side witch is not that much force I cut out some of part. 


side view

top view
 bridge hight =3.375
bridge length=23.625
cost of the bridge
At first I use all 1.125’’ chord as a base. Then I find out it is too short and also the K’NET connect is not work really well and it also cost a lot of more money. Then I change the 1.125 to 3.375. it use less chord than the 1.125. About the link part I first use all 360 degree grooved gusset plate. Then I find out that 180 degree grooved gusset plate can do the same job with lower lost. I lower my cost a lot by these two steps.
By design this bridge I get a basic idea what a K’nex bridge would look like. It is different that the WPBD. In the WPBD the program would allow you to change different length and size of the bridge. In the K’nex it only have same size and 5 length. It lowers the possibility to design a bridge. I did not have the chance to try the bridge and see how it works out. I think this bridge would be reasonable good.         

Week 5 - Kyle Hayes


I was sick and unable to attend class this week and therefore I am unable to provide my experience, however I did go over the slides and look up the constraints and pieces and cost of the pieces and I feel that I have a fair understanding of what happened without being there.

The K’NEX will be more restrictive, there is only one material, and there are predesigned lengths and thicknesses, where on WPBD this could be customized. Similarities are obviously they will both test designs and help analyze information; WPBD will give values where as the K’NEX will only tell us that it broke here therefore it needs to be strengthened. WPBD is under perfect conditions and is only a simulation but K’NEX will be a real prototype and will not work perfectly, there will be many small factor that affect each individual piece as each piece is different. I feel that unexpected results may occur with the K’NEX due to all the small factors and the lack of full customization. The K’NEX design will be much more challenging due to the constraints and predetermined lengths and it will much harder to lower cost as you would have to change the design and shape rather than the material thickness and type. Overall I find the two to be fairly different, they both test bridges but have very different styles of design and testing.

Next week we will begin using the K’NEX and start with our individual designs which will be tested and then what we individually gathered will come together in the end to form one final team bridge.

-          Kyle Hayes